 |
| Made the mask too. |
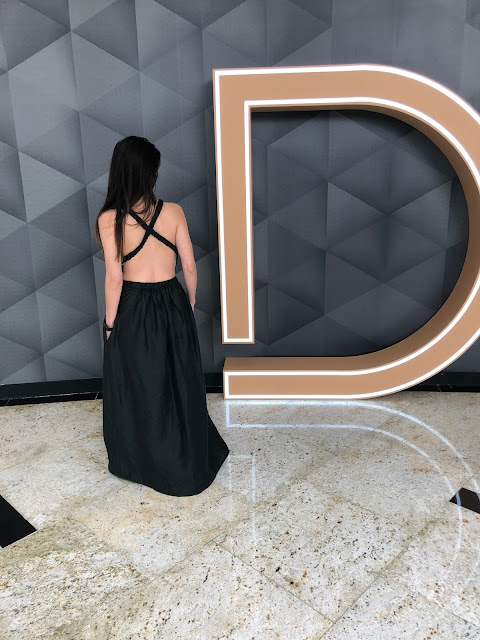
Oolala. That's how I feel in this dress, which I finished sewing last weekend. It is made out of a luxurious deep green linen and while the dark color and floor-length skirt make it look formal in photos I think it looks more daytime appropriate in person. (Plus you can't tell this but I'm wearing it with white sneakers.) It started, as a surprising number of things do these days, with an Instagram ad. The ad was from Sir the Label, a new-to-me Australian brand whose romantic, skin-bearing dresses instantly caught my eye. However, the dress this is based on, the Aramis, retails for $480 (oddly enough in both USD and AUD) so that wasn't going to happen. Plus, their version has no pockets (that I can discern) so I figured this was a great candidate for a DIY.
Once again, in my experience of DIYing dresses, the skirt came together just fine but the bodice gave me problems. In this case, the skirt was easy. I wrapped the fabric around my waist so it went all the way around, then cut two identical rectangles at that size (these pieces needs to be larger than you are, so that when you put the elastic in, it gathers up). I added pockets, put in the elastic, hemmed the bottom, and bingbangboom: one skirt. (The first few times I did pockets they were such a struggle and I had to watch this youtube video several times. Now it is the easy part and it thrills me to know I'm getting better at this.)
I ended up making two practice tops before I cut into the linen for the real one. The first one I made v-neck and I didn't like the look of it with the skirt - I think it was too much skin. The second one was sans v-neck (like the dress this is based on) and I stuck with that once I found the right fabric. The straps are also elasticized and wrap across the back and around the sides.
The last piece was noticing that the skirt looked pretty cute on it's own. The bodice, possibly because of the elastic and very possibly due to beginner's luck, fit pretty well and doesn't ride up/expose my stomach even when it doesn't have weight of the skirt pulling it down. I decided to make it detachable from the skirt, to make this a little more versatile. In these photos the pieces aren't secured yet, as I keep going back and forth on if I want to use buttons or some kind of snaps on the inside (which I'd need to go purchase).
All in all, a sewing win. The fabric cost about $25 and I love the finished product, both as a dress and as a skirt. Is there any brand that you wish you could DIY?
Thanks for stopping by!


I love this one! And sick new photo in front of that giant D! Lol. DId you use the mask pattern I sent you? Looks different than the ones you made previously.
ReplyDeleteI was so psyched when I saw that "D" (and my cameraman really outdid himself haha)
DeleteThe mask was a free pattern from Craft Passion: https://www.craftpassion.com/face-mask-sewing-pattern/
OOo this one is great! I would say Monse is one that I'd like to do more DIY with.
ReplyDeleteThank you! Also, yea, Monse would be a lot of fun since so many of their looks are deconstructed and really unique.
DeleteSuper-cool and very successful-looking DIY project! If I had room for a sewing machine at home and was able to start learning how to DIY, I'd love to be able to make some Elizabeth Suzann-like pieces, now that the company is closed and probably not coming back as a larger company.
ReplyDeleteThank you! Speaking of Elizabeth Suzann-like pieces, she released a bunch of her patterns when she closed the company (I'll send you a link to it on instagram) that some generous sewists put into a home-use format, so you can download and make some of her pieces yourself. I made a Clyde jumpsuit for myself that I'll be hopefully putting a post about soon.
Delete